In part 3 we connected the T65s. They look great in the living room, but you can’t take them to the bedroom. For the rest of the house I use cordless DECT phones, connected to MikoPBX through a Gigaset N510 IP PRO base station.

What you need
A DECT base station with SIP
The N510 IP PRO connects up to six handsets to a phone system. Each handset can get its own SIP account, so each one becomes a separate extension in MikoPBX. Mine runs firmware version 42.263.
Power over Ethernet (PoE)
The N510 can be powered over its network cable. Mine is connected to a 16-port PoE switch from Ubiquiti in the meterkast,1 so it needs just one cable. A power adapter is included too, if you don’t have PoE.
Handsets

Any Gigaset handset will do, and in theory any DECT handset that supports the GAP standard. I have a mix of models, I sourced all of them second hand on Marktplaats and Vinted:
| Handset | Number | My verdict |
|---|---|---|
| Gigaset S650H PRO | 3 | My recommendation: great build quality and all features. They do look a bit businesslike. |
| Gigaset CL540H (Dune) | 1 | Very close to the S650H, and it looks great. |
| Gigaset CL390HX | 1 | Looks nice, but feels cheap and has a low-resolution monochrome display. |
For the PRO handsets, ProVu keeps an overview of which features work with which base station. That same page states that only PRO handsets are supported with the PRO base stations. Supported is not the same as working, though: my CL390HX and CL540H work fine with the N510. That’s because they support the GAP standard, so basic calling always works. I couldn’t find an overview of which extra features work with a PRO base station; that’s a matter of trying.

So how do the consumer handsets do in practice? I couldn’t find any features that are really missing. The differences are mostly in the hardware. The CL390HX feels plastic and cheap, and has a monochrome display with a very low resolution: I seriously think one pixel is about a square millimeter. The CL540H is a different story. It’s very much like the S650H, with the same high-resolution color display and the same menus. It just has fewer buttons. For example, it has no separate R key, which you need for a consultation call, for instance to transfer a call. But holding down the 0 key does the same thing, and that works on the CL390HX too.
All of them support HD voice2. They use the G.722 codec, which sounds noticeably better than a classic phone line. Of course, for a call between an analog T65 and one of the DECT handsets, the analog line is the bottle neck for sound quality. So the HD voice is only noticable when calling between DECT handsets, or when making an outside call to a phone that also supports it, such as a modern smartphone.
Step 1: extensions in MikoPBX
Create an extension in MikoPBX for each handset, exactly like we did for the ATA in part 3, with the same network filter. Following my numbering plan, the handsets got 23 on the ground floor, 31 to 33 on the first floor and 41 on the second floor.
Step 2: log in to the N510
The N510 gets its IP address through DHCP. I gave it a fixed reservation in my router, so it can always be found at the same address. Open that address in your browser and log in with the default PIN 0000. Change that PIN right away: it protects the web interface and is also needed for some actions on the handsets.
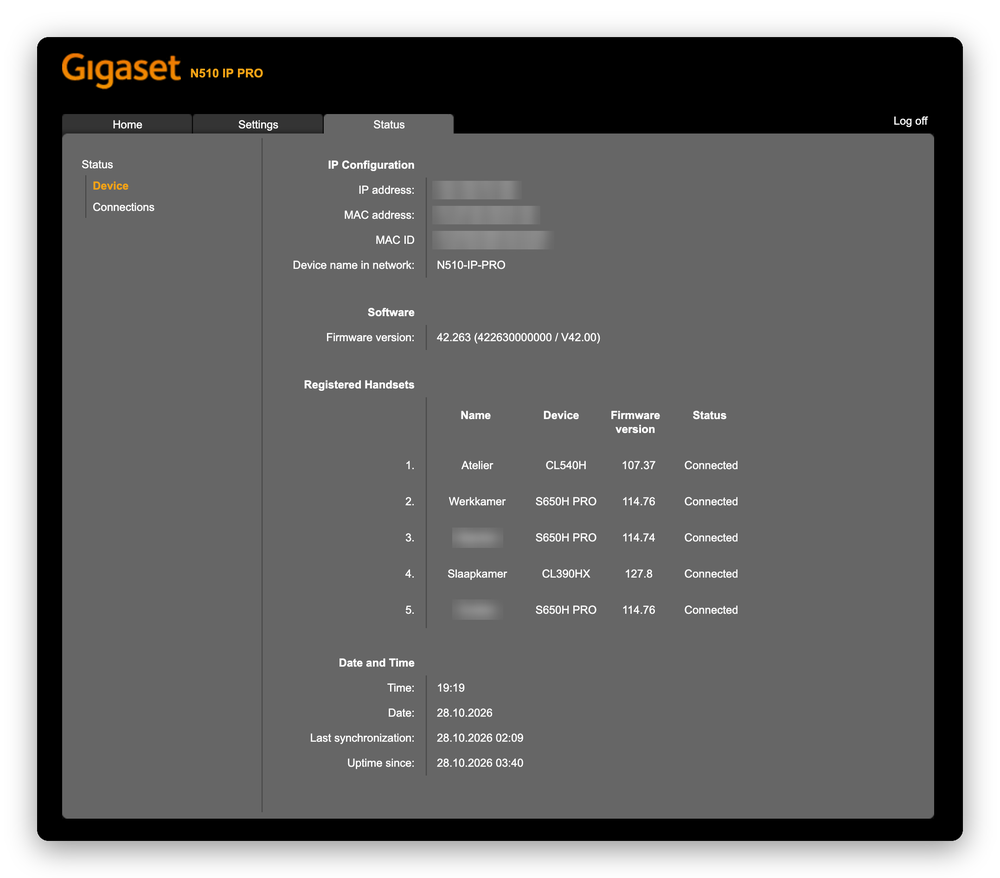
The Status page shows the firmware version and the registered handsets. On a new base station that list is still empty, of course.
Step 3: a SIP connection per handset
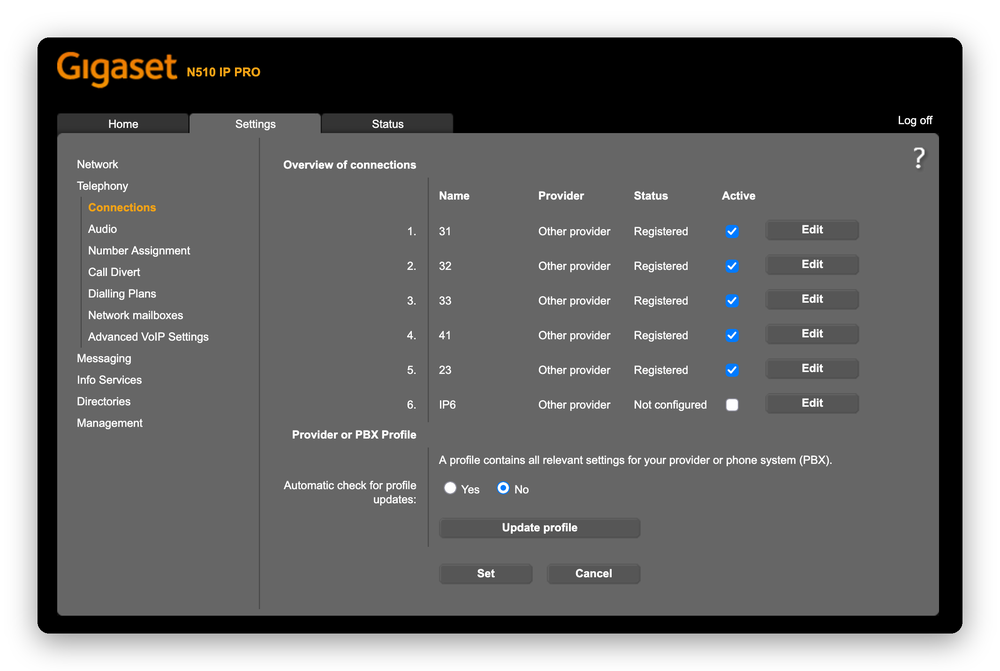
Go to Settings → Telephony → Connections. There are six IP connections, one for each possible handset. Click Edit on the first one and fill in the details of the extension from step 1:
| Field | Value |
|---|---|
| Connection name or number | The extension number, like 31 |
| Authentication name | The extension number |
| Authentication password | The SIP password from MikoPBX |
| Username | The extension number |
| Display name | The name of the room, like Werkkamer |
Then click Show advanced settings:
| Field | Value |
|---|---|
| DNS SRV Lookup | No |
| Domain, proxy server address and registration server | The IP address of the NAS |
| Proxy server port and registration server port | 5060 |
| STUN enabled | No |
| Outbound proxy mode | Automatic |
STUN and DNS SRV are meant for providers on the internet. MikoPBX is on the same network, so we don’t need them.
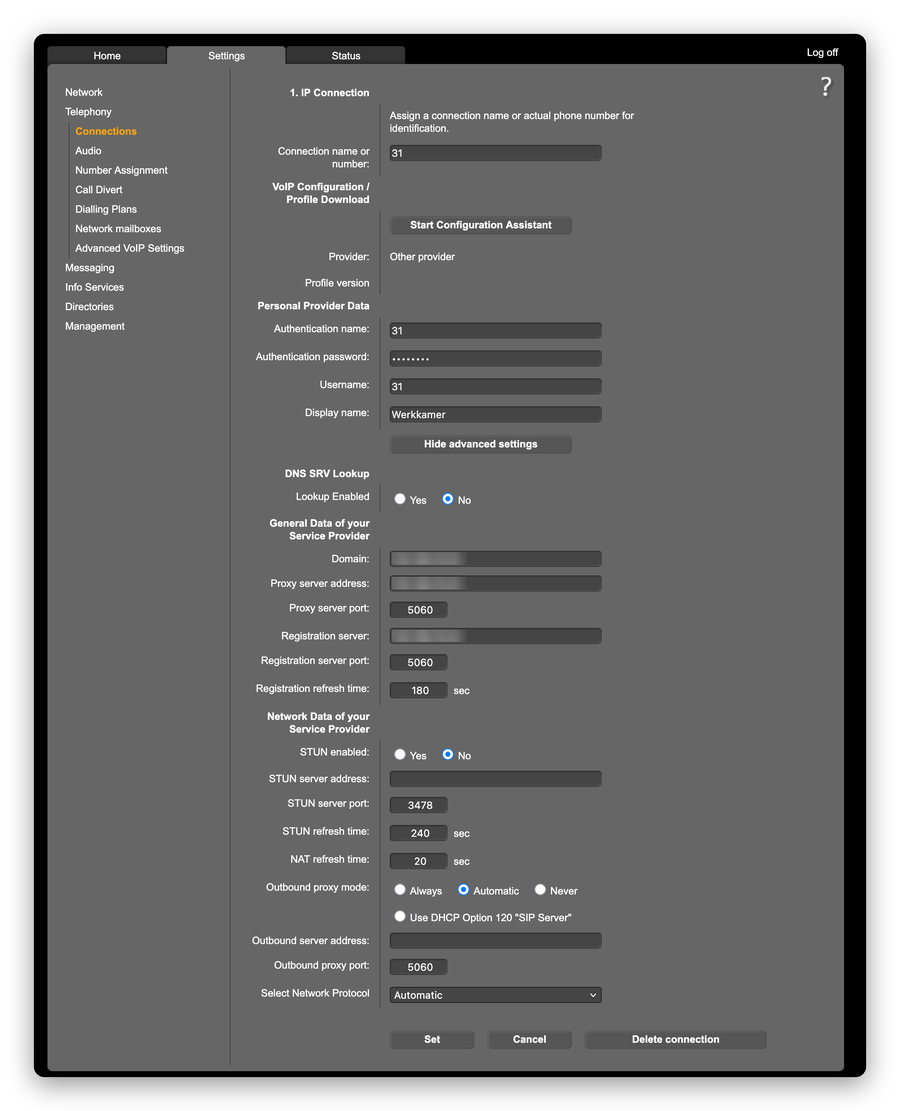
Click Set and repeat this for every handset. The overview should then show all connections as Registered:
Step 4: register the handsets
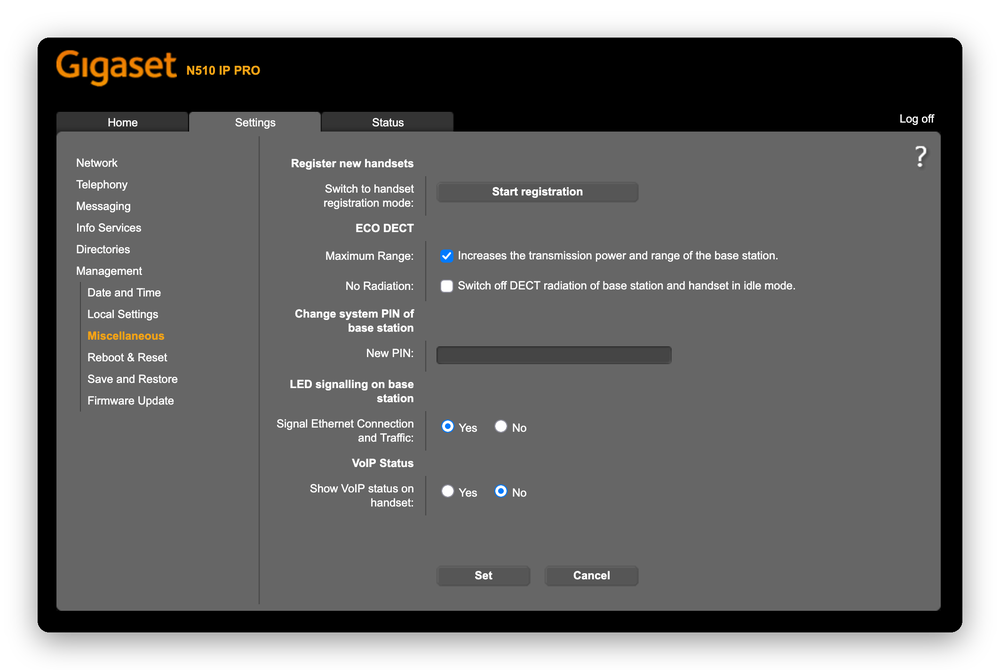
Next, the handsets need to be paired with the base station. First put the base station in registration mode: go to Settings → Management → Miscellaneous and click Start registration. Then register the handset from its own menu. The handset asks for the system PIN of the base station, which you can change on the same page, under Change system PIN of base station.
Step 5: connect handsets to SIP connections
Finally, tell the base station which handset uses which SIP connection. That’s done under Settings → Telephony → Number Assignment. This step is easy to get wrong, because the N510 is designed for a different situation than ours.
The N510 assumes its connections are phone lines, for example several phone numbers from a provider. That’s why every handset gets two settings:
- For outgoing calls: exactly one connection, the line this handset calls out on. You can also let the user pick a line for every call.
- For incoming calls: one or more connections. The handset rings for each connection that’s checked, so several handsets can ring for the same number.
In our setup, each connection isn’t a phone line but the extension of one specific handset. So every handset needs exactly one connection, its own, for both outgoing and incoming calls. If you check more connections for incoming calls, a handset also rings for the extension of another room, and that’s confusing. Which handsets ring for an outside call is something MikoPBX decides, as we’ll see in part 5.
For the handset in my studio, that’s connection 23 in both columns:
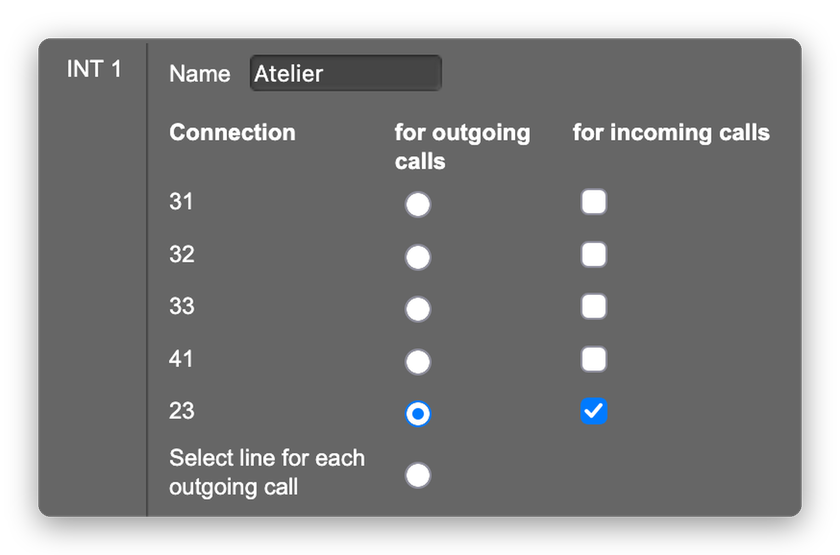
Repeat this for each handset, and make sure the two columns always match.
Internal calls and a phonebook
Gigaset handsets have an INT button for internal calls between handsets. Those calls go through the base station only, not through MikoPBX. I don’t use it: the analog T65s can’t be added to that list, so you’d have two ways of calling each other inside the house. It’s simpler to always use the two-digit numbers.
To make that easier, I created a phonebook with all internal numbers and uploaded it to the handsets through the web interface. That has to be done per handset, with a phonebook file in .vcf format. I keep the list in a simple text file and generate the VCF file from it with a small script (more on that below).
The upload is under Settings → Directories → Directory Transfer:
- Under Mobile device, select the handset.
- Click Browse and pick the
.vcffile. - Click Transfer to copy the phonebook to that handset.
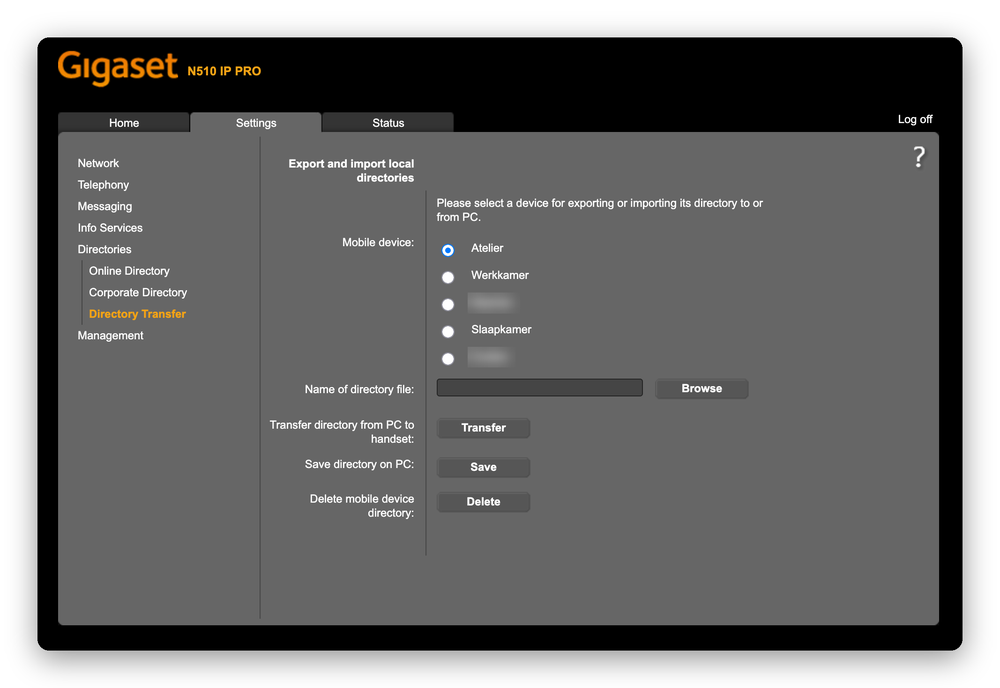
Repeat this for every handset. The same page has two more useful buttons: Save downloads a handset’s current phonebook to your computer, and Delete empties it. Handy if you want to start with a clean phonebook before uploading a new version.
The phonebook script
The script is on Codeberg. You write your contacts in a plain text file, with a section for internal and one for external numbers, and one name; number per line:
[internal]
Living room; 21
Study; 31

[external]
Grandma; 0123 456789
The script turns that into a .vcf file for the handsets. It also makes a PDF with four phone cards to print: internal numbers on the front, external numbers on the back. Handy next to a T65, which has no phonebook at all. It’s a Python script; with uv installed, uv run make-vcard.py contacts.txt is all it takes. See the README for the details, such as multiple numbers per contact.
Next up
All phones in the house can now call each other. In part 5 we connect the outside line, so we can call the rest of the world too.
-
The meterkast is the cupboard near the front door that every Dutch house has, where the utility meters, the fuse box and, these days, the internet connection live. Learn Dutch For Expats explains it in more detail. ↩↩
-
For consumer handsets, Gigaset usually indicates that with HX in the type. For example, there is also a CL390 without HX, and that one doesn’t support HD voice. Gigaset isn’t entirely consistent with its naming, though: my CL540H supports HD voice without the X. PRO models seem to always support it. ↩